In any case David Chang's pork buns are served at all his restaurants: Noodle Bar, Ssam Bar, Milk Bar, Ma Peche, nearly brand-new Booker and Dax, and I have to believe they must have them at tasting menu, on live reservation only, single daily seating Ko (probably one of the top 5 most difficult to get into NYC restaurants). I've had them only a couple times, but they are quite good.
Also, hopefully, I'll have a guest entry from Karen when the event nears.
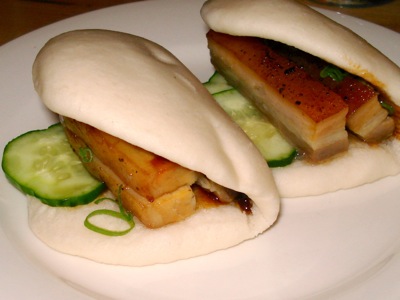
momofuku pork buns serves 1
(from Momofuku)
- 1 Steamed Bun (recipe to follow)
- About 1 tablespoon hoisin sauce
- 3 or 4 slices Quick-Pickled Cucumbers
- 3 thick slices Pork Belly
- 1 scant tablespoon thinly sliced scallion (green and white)
- Sriracha, for serving
- Heat the bun in a steamer on the stovetop. It should be hot to the touch, which will take almost no time with just-made buns and 2 to 3 minutes with frozen buns.
- Grab the bun from the steamer and flop it open on a plate. Slater the inside with the hoisin sauce, using a pastry brush or the back of a spoon. Arrange the pickles on one side of the fold in the bun and the slice of pork belly on the other. Scatter the belly and pickles with sliced scallion, fold closed, and voilà: pork bun. Serve with sriracha.
steamed buns makes 50 buns
"Okay, fifty buns is a lot of buns. But the buns keep in the freezer for months and months without losing any quality, and if you cut the recipe down any more than this, there's barely enough stuff in the bowl of the mixer for the dough hook to pick up. So clear out a couple hours and some space in the freezer and get to work."
- 1 tablespoon plus 1 teaspoon active dry yeast
- 1 1/2 cups water, at room temperature
- 4 1/2 cups bread flour
- 6 tablespoons sugar
- 3 tablespoons nonfat dry milk powder
- 1 tablespoon kosher salt
- Rounded 1/2 teaspoon baking powder
- 1/2 teaspoon baking soda
- 1/3 cup rendered pork fat or vegetable shortening, at room temperature, plus more for shaping the buns, as needed
- Combine the yeast and the water in the bowl of a stand mixer outfitted with the dough hook. Add the flour, sugar, milk powder, salt, baking powder, baking soda, and fat and mix on the lowest speed possible, just above a stir, for 8 to 10 minutes. The dough should gather together into a neat, not-too-tacky ball on the hook. When it does, lightly oil a medium mixing bowl, put the dough in it, and cover the bowel with a dry kitchen towel. Put it in a turned off oven with a pilot light or other warmish place and let rise until the dough doubles in bulk, about 1 hour 15 minutes.
- Punch the dough down and turn it out onto a clean work surface. Using a bench scraper or a knife, divide the dough in half, then divide each half into 5 equal pieces. Gently roll the pieces into logs, then cut each log into 5 pieces, making 50 pieces total. They should be about the size of a Ping-Pong ball and weigh about 25 grams, or a smidge under an ounce. Roll each piece into a ball. Cover the armada of little dough balls with a draping of plastic wrap and allow them to rest and rise for 30 minutes.
- Meanwhile, cut out fifty 4-inch squares of parchment paper. Coat a chopstick with whatever fat you're working with.
- Flatten one ball with the palm of your hand then use a rolling pin to roll it out into a 4-inch-long oval. Lay the greased chopstick across the medium of the oval and fold the oval over onto itself to form the bun shape. Withdraw the chopstick, leaving the bun folded, and put the bun on a square of parchment paper. Stick it back under the plastic wrap (or a dry kitchen towel) and form the rest of the buns. Let the buns rest for 30 to 45 minutes: they will rise a little.
- Set up a steamer on the stove. Working in batches so you don't crowd the steamer, steam the buns on the parchment squares for 10 minutes. Remove the parchment. You can use the buns immediately (reheat them for a minute or so in the steamer if necessary) or allow to cool completely, then seal in plastic freezer bags and freeze for up to a few months. Reheat frozen buns in a stovetop steamer for 2 to 3 minutes, until puffy, soft, and warmed all the way through
MAKES ENOUGH PORK BUNS FOR 6 TO 8 BOWLS OF RAMEN OR ABOUT 12 PORK BUNS
quick salt pickles, master recipe
MAKES ABOUT 2 CUPS
Halve or double the recipe as needed.
- One 3-pound slab skinless pork belly
- 1/4 cup kosher salt
- 1/4 cup sugar
- Nestle the belly into a roasting pan or other oven-safe vessel that holds it snugly. Mix together the salt and sugar in a small bowl and rub the mix all over the meat; discard any excess salt-and-sugar mixture. Cover the container with plastic wrap and put it into the fridge for at least 6 hours, but no longer than 24.
- Heat the oven to 450˚F.
- Discard any liquid that accumulated in the container. Put the belly in the oven, fat side up, and cook for 1 hour, basting it with the render fat at the halfway point, until it's an appetizing golden brown.
- Turn the oven temperature down to 250˚F and cook until the belly is tender--it shouldn't be falling apart, but it should have a down pillow-like yield to a firm finger poke. Remove the pan from the oven and the mea juices from the pan and reserve (I'm guessing this is the fat one would use in making the steamed buns.). Allow the belly to cool slightly.
- When it's cool enough to handle, wrap the belly in plastic wrap or aluminum foil and put it in the fridge until it's thoroughly chilled and firm. (You can skip this step if you're pressed for time, but the only way to get neat, nice-looking slices is to chill the belly thoroughly before slicing it.)
- Cut the pork belly in to 1/2-inch-thick slices that are about 2 inches long. Warm them for serving in a pan over medium heat, just for a minute or two, until they are jiggly soft and heated through. Use at once.
quick salt pickles, master recipe
MAKES ABOUT 2 CUPS
Halve or double the recipe as needed.
- Vegetable, prepared as indicated
- 1 tablespoon sugar, or more to taste
- 1 teaspoon kosher salt, or more to taste
- Combine the vegetable with the sugar and salt in a small mixing bowl and toss to coat with the sugar and salt. Let sit for 5 to 10 minutes.
- Taste: if the pickles are too sweet or too salty, put them into a colander, rinse off the seasoning and dry in a kitchen towel. Taste again and add more sugar or salt as needed. Serve after 5 to 10 minutes, or refrigerate for up to 4 hours.
Great! I will take these buns on! Can't wait to go to 88! I wonder where they got the name "Super 88"? Reminds me of GMC's "Delta 88". Anyway I'll make those pickles also!
ReplyDeleteThe pickles are dead easy. Of course you're making them.
ReplyDeleteLooking forward to your guest entry. Make sure you photograph relevant stages.
ReplyDeleteGuest Entry? Of the people who reply "yes"? So far none I don't think, but I'll keep you posted. I'm making some pickles today because cucumbers were on sale. I'm going to try to buy the buns, because I feel that they would probably be better than my first time trying to make them.I will still need to get a steamer though, excited about that! I will photograph relevant stages. I made a "to-die-for" French Onion soup the other day, probably the BEST FO soup that I've ever had. My only regret.... I didn't photograph it! It was so beautiful... too hungry. Patience made the FO Soup delicious!
DeleteOkay so I'm a dork. I woke up in the middle of the night and realized what "Guest entry" you are speaking of. Here on your blog? Duh! (natural blond)
ReplyDelete